System can show you Vendor SKUs and costs to facilitate fulfillment and allow for Batch PO use case. You can add this info manually via Vendor SKU entry popup on PO page, but it's advised to preload your vendor catalogs to minimize manual work.
1) Match products & Update
To import new vendor catalog, navigate to Modules / Supplier Modules, select Common Text Loader v2 and hit Add.

New Supplier Module page will be opened with default recommended settings for product matching process. Select vendor and enter name for the new module (e.g. Vendor Name - Product Matching).
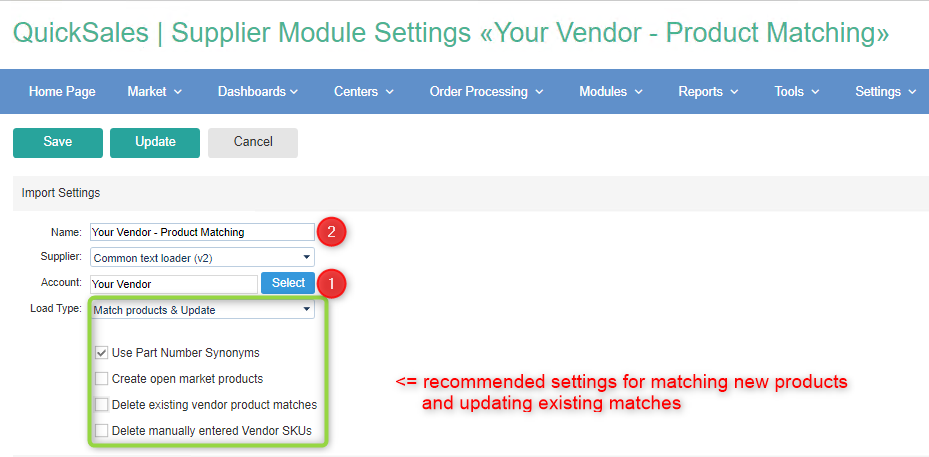
- Use Part Number Synonyms (ON by default)
Disable if you are loading exact matches from prepared spreadsheet. - Create open market products (OFF by default)
Enable to create catalog products for skipped vendor products when you are sure mapping is correct. - Delete existing vendor product matches (OFF by default)
Enable to delete previous matches during module run (e.g. to wipe out costs for discontinued items). - Delete manually entered Vendor SKUs (OFF by default)
Enable to wipe out Vendor SKUs entered by system users if needed.
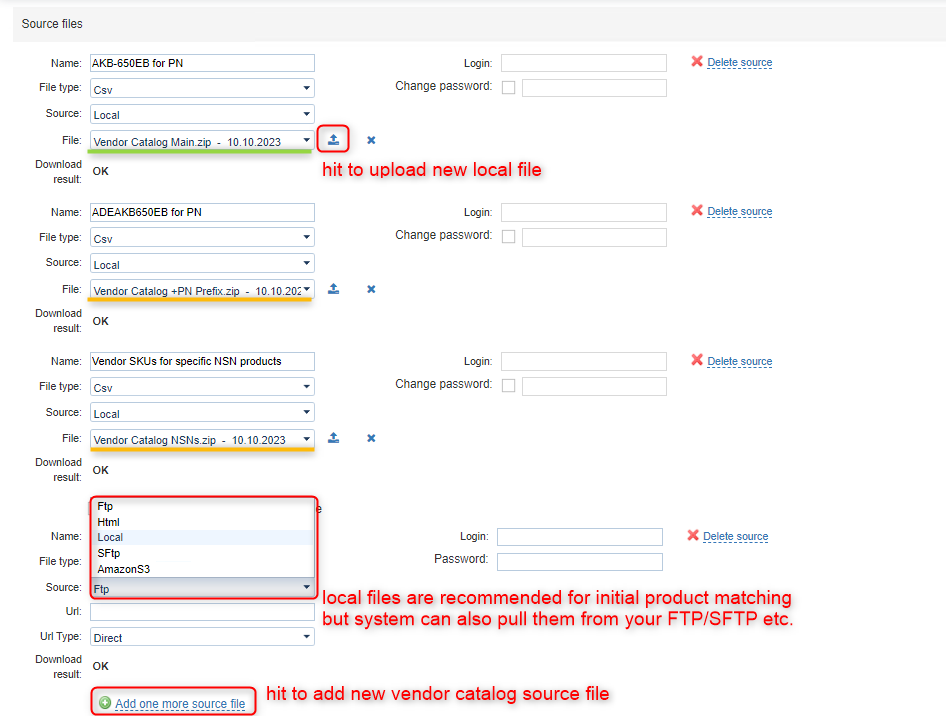
Please add all vendor catalog parts as different source files. Source files can be used to load several parts of a big catalog or process custom variations of the same file (PN w/ prefix - PN w/o prefix - NSN numbers as part numbers, etc.). System will process all source files one by one and assign Vendor SKUs, etc. to catalog products that were found by combination of mapped Manufacturer + Part Number fields (+ their synonymic variations if Use Part Number Synonyms is ON).
- It's OK to start with just single file, then add its modification as another source file to have more matches if needed.
- It's OK to get back to the module when you receive a new catalog from your vendor with added items, and add as another source file after existing version.
- NEW! With 'Delete existing vendor product matches" = OFF, there's no need to keep all catalog parts/variations as individual source files - you can do layer-by-layer product matching instead. Just replace the source file to a newer one and run the module. System will match new products and update existing ones.
After source files are configured, proceed to mapping fields. We've highlighted recommended fields as bold. You might need to select delimiter that matches your source file and hit Reload files to update fields in mapping table.

Hit Update Example Data to review how raw data was parsed to system via mapping settings. When you are satisfied, you can enable Pass headers checkbox and save module.

System will return you to previous screen where you can Run the module to start the product matching process.

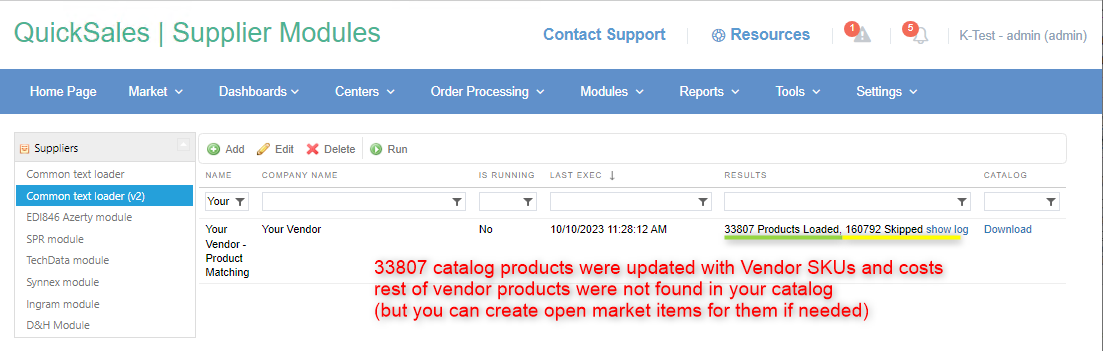
We recommend to re-run product matching modules each time after updating your QuickSales product groups - it will assign Vendor SKUs to newly created products.
2) Locate by Vendor SKU & Update
There's no need to do product matching for general costs/qty updates - we have a dedicated mode that uses Vendor SKU search mode and runs faster (noticeable on big catalogs). More important, in this mode system will update all products having this Vendor SKU - including those that were added manually.

Since all product matching was done before, you only need to map Vendor SKU field to locate products + map those fields that you want to update.

Save module and hit Run to update costs for all products having mapped Vendor SKUs.
We recommend to use this mode for daily updates.